
A step by step guide for DIY netting for raised garden beds including all the materials and cost.
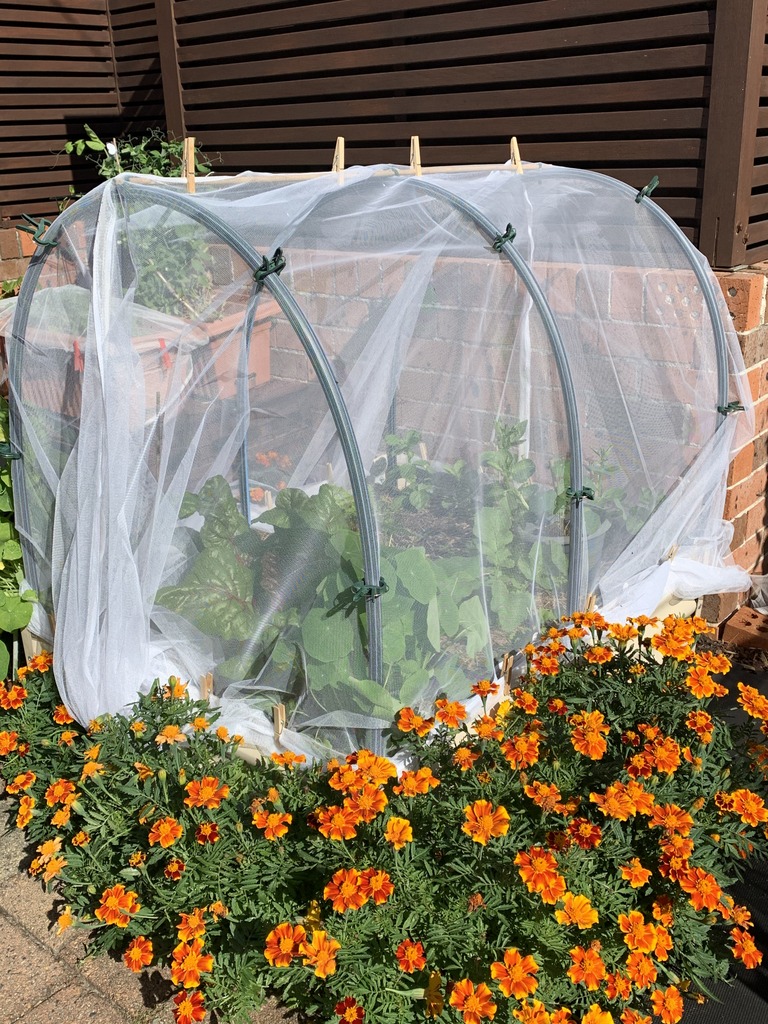
DIY Netting for Raised Garden Beds – Photo © The Gourmantic Garden
When it comes to crop protection from cabbage moths and other critters, installing netting for raised garden beds is a worthy option. In this article, I’ll be sharing our DIY solution including the design, the materials we used and how much it cost.
Most of the netting solutions I’ve seen online apply to raised timber garden beds and involves drilling. My raised garden beds are made of steel and I’m not keen on drilling holes in them. When it comes to materials, there are a few options you can use such as PVC pipes, metal tubes and so on. After weighing in the benefits and what would work best in my setting, I decided on a combination of poly pipes, bamboo stakes and tulle fabric.
Netting Design for Raised Garden Beds
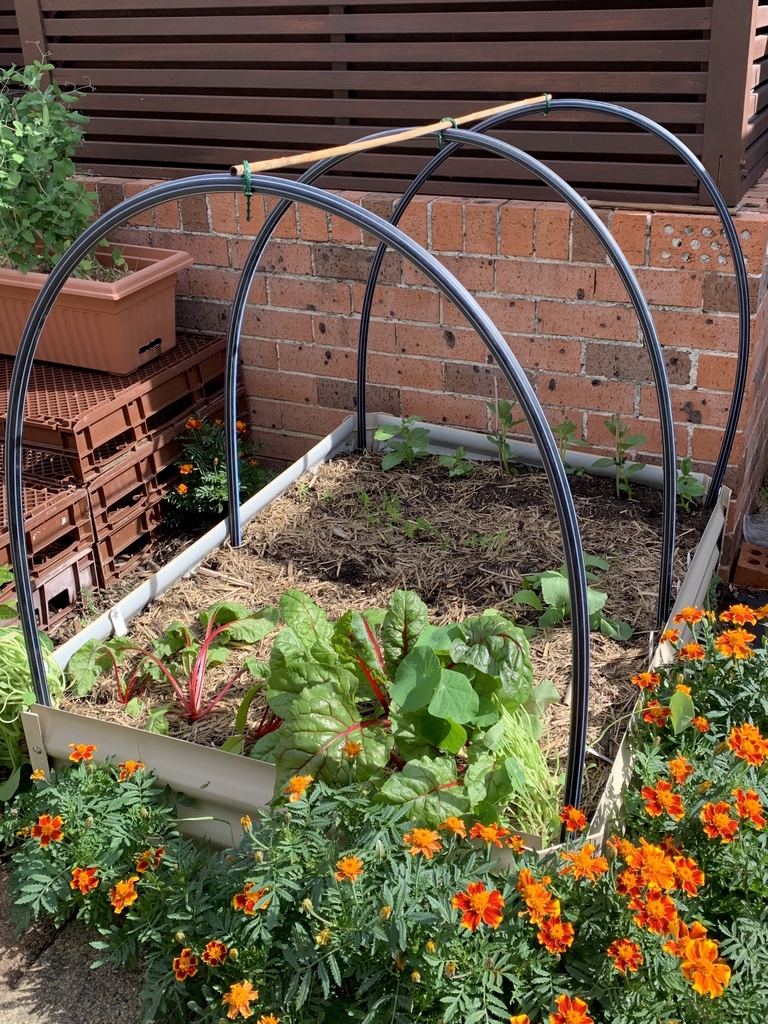
Netting for Raised Garden Beds – Photo © The Gourmantic Garden
My raised garden beds are 1.2m long, 0.9m wide and 30 cm deep. The poly pipe is 20mm in diameter. It’s rigid enough to provide support without having to resort to heating and bending as is the case with PVC pipes. It’s also smooth and less likely to catch on the tulle fabric, the clips or the pegs. The arches or hoops are approximately 80cm high and secured in six locations, one in each corner and two in the centre. The ends of the pipe are secured over bamboo stakes sitting inside the raised garden bed and pushed firmly into the soil. For this design, there’s no drilling required whatsoever.
Materials for Frame & Netting for Raised Garden Beds
These are the materials we used for a 1.2m long, 0.9m wide and 30 cm deep raised garden bed.
- 3 lengths of Vinidex 20mm x 3m PE100 poly pipe ($9.95 each from Bunnings)
- 7 x 1m long bamboo stakes
- 3 adjustable plant ties
- 12 plant clips
- 6m long x 1.37m wide tulle polyester net ($2 a metre from Spotlight)
- 2x instant hem tape, 19mm 4.57 m long ($6.50 each from Spotlight)
- wooden pegs to secure the netting ($2 from Coles)
As you can see, I’ve included the cost and where they were purchased from (not that this is not sponsored in any way). I already had bamboo stakes. The plant ties and clips were from a special I had previously bought from Bunnings for $2.
Instructions for DIY Netting for Raised Garden Beds
Here are the step by step instructions for constructing the netting and frame :
1. Cut 40 cm off each poly pipe. Keep the left over aside as they may come in handy for other jobs.
2. Cut the bamboo into 40 cm lengths. Secure two together at each of the six points inside the raised garden bed by pushing them into the soil.
3. Insert one end of the poly pipe over the bamboo pieces then the other on the corresponding side to form an arch.
4. Repeat for the other two pipes.

Adjustable plant ties – Photo © The Gourmantic Garden
5. Place a bamboo stake over the three poly tube arches running along the length of the garden bed and secure with adjustable plant ties as in the photo above.
6. This next step is best done indoors. Cut off the tulle fabric in half so that you have 2x 3m pieces, 137mm wide. Place one layer over the other and lay on a flat surface. Place the hem tape over one length then secure it to the other.
7. Lay the tulle fabric over the poly tube frame so that the hemmed seam lines up with the bamboo stake than runs the length of the raised garden bed.
8. Secure the netting to the raised bed with pegs as tightly as you can.
9. Attach the plant clips to the poly pipe for extra security.
As you can see from the photos, there is left over fabric which I’ve tied together using a rubber band. This is in case I want the hoops to be higher at some point.
I have two raised garden beds and the other has a slightly different solution as I’m growing peas against the wall which are already quite tall. You can see the other bed in this instagram post.
Tips
- For the netting to be effective, the mesh size of the netting needs to be very small. The mesh size of the tulle fabric we used is 2mm.
- It’s best to have the netting tightly attached all around the bed.
- Avoid having the netting touch any of the plants as cabbage moths and other insects can still lay their eggs on it.
- If you’re growing any crops that needs pollinators, you’ll need to remove the cover every so often to let them in.
For each garden bed, the cost of the netting and frame came to just under $60. It’s not very cheap considering the poly pipe cost half the amount but it has been well worth it for my edible garden. I can easily remove the netting and work underneath then secure it with pegs. When it’s no longer needed, the netting and the frame can easily be removed and stored. Come summer time, the frame can be used to secure shade cloth during those hot sweltering days.
Want to Know More About the Garden?
You’ll find more information on how to grow 50 botanicals, which varieties to try, how to pair them with food and spirits, and how to use them in cocktails including a full recipe in my 260+ page digital book GROW YOUR OWN COCKTAIL GARDEN available now.

